- Home
- How to Make Pro Cookies
- How to Bake Sugar Cookies
How to bake sugar cookies. Save Valuable Time.
How to bake sugar cookies. Let’s start with the baking sheets.
Next, begin by preparing your baking sheets with parchment paper.
Sidenote: The ½ sheet baking pans comfortably hold 12, 3” sugar cookies and fit bread rack shelves.
The full sheets hang over the edges as seen on my Best Baking Sheets page.
This photo shows my process when cutting out more than one sheet of cookies. This allows you to be able to stack the cookie pans. Yes, those are plastic medicine cups turned upside down. They are sturdy and strong this way.
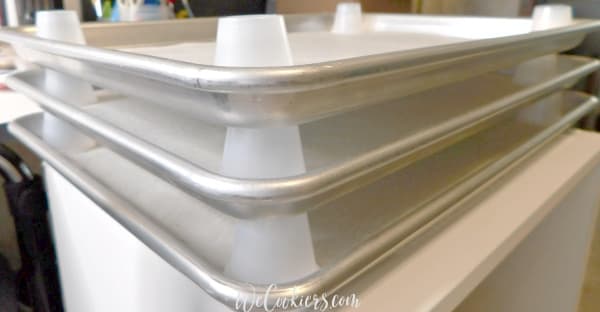
Why would you stack the sheets? Because with this superb and delectable sugar cookie recipe, you’ll want to freeze the cookies first. I slide them, stacked, right into the freezer uncovered until frozen.
If you don't have a baker's rack, you can still use this method to dry the decorated sugar cookies overnight or as you are decorating. This is a great space-saver!
However, I still wouldn't want to be without my 20-tier bread rack. It rolls from my kitchen to my workroom with great ease (on the carpet). It is a true jewel when drying iced cookies too.
The Amazon link below takes you to a company that sells the 10 and the 20 tiers. If you are projecting to grow your business, it's cheaper, in the long run, to opt for the 20-tier.
This image link takes you to the choice of the 10 or 20 shelf rack:
- Long-Lasting Aluminum Bun Pan Rack: Giantex bakery rack is crafted of durable and corrosion-resistant premium aluminum whose edge is polished and roundly handled to protect your hands. Rust resistance enables the rack to maintain long-period use and keep rust-resistant. It is perfectly suitable for both home and commercial use.
- 10 Tiers Bread Cooling Rack: This bun pan sheet rack is able to hold 10 full size sheet pans or 20 half size sheet pans. Its loading capacity can reach up to 33 lbs. Space between each two rack tiers is enough for containing baked food on this storage rack.
- Bakery Display Cart on Lockable Wheels: 4 flexible wheels make the kitchen cart easy to move. Two casters can be locked at any time to ensure stability when the kitchen bread rack stops. It also brings much convenience for carry or move baking food. It is suitable for both home kitchen and commercial use.
- Space-Saving & Open Speed Rack: Open-ended rack is not only easy for putting or taking the pan sheets but also convenient for making food neatly organized and easy-to-pick up. Compact kitchen cart also save much storage space.
- Food Service Storage Rack with Simple Assembly: With complete hardware and specific manual, the bread rack will be assembled well in short time. It's a great cooling stand for pastry, cookies, bread, dough, pizza. Smooth surface and open-ended design make it easy to maintain it clean. The easy-moving aluminum mobile rack meets contemporary people needs of concise style.
If you need a rack but just can't afford one, you can try this hack. On a Facebook group I saw a post by Jen's Macarons in Pensacola, FL. She posted this picture as a workaround for a baker's rack. Ingenious and affordable!
It's a little more affordable. However, you probably do not want to roll it around once loaded with cookie trays because the rack isn't real sturdy.
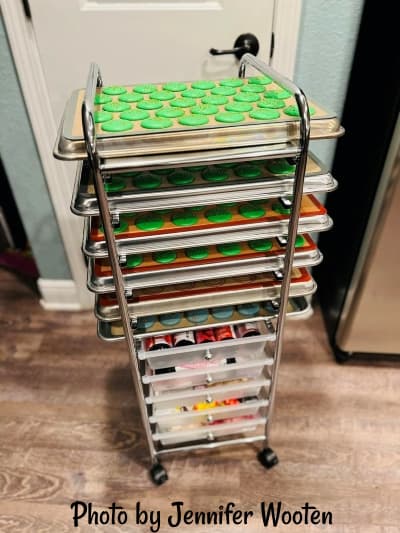 She uses 1/2 sheet baking pans on the cart. The baking pans fit right side up or upside down.
I asked her if I could use her picture here to inspire you. She kindly said yes.
Below is a link to Amazon for the size you need if you want to go this route. It'll get you started looking if you are interested in something more moderately priced than a baker's rack.
- MULTIPURPOSE ORGANIZER - 10 drawers provide plenty of space for keeping your home office supplies tidy and close, organizing makeup and cosmetics, storing arts and crafts supplies, and arranging tools for use in the garage
- ORGANIZER DIMENSIONS - 12.8" W x 15.4" D x 38.2" H; inner drawer dimensions: 9.5" W x 13.63" D x 2.5" H
- TRANSLUCENT FINISH - Private, all-black polypropylene drawers protect drawer contents from peeping eyes
- REMOVABLE DRAWERS - Easy to install and easy to remove, the drawers slide unattached through metal channels. Take your stuff with you when you need it
- MOBILE STORAGE SOLUTION - Four casters (two locking) allow the cart to go where you need; tall handles make it easy to push and pull
How to bake sugar cookies…roll, cut, bake
I cut out a huge amount of sugar cookies each week.
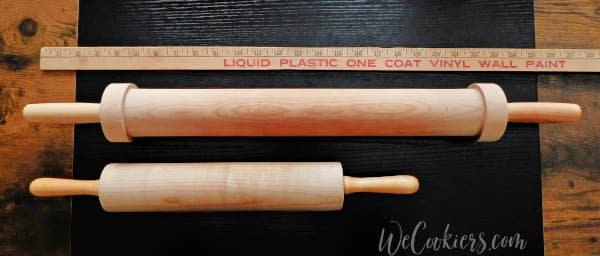
I was able to save considerable time rolling out the cookie dough by using this colossal rolling pin:
My cookie dough recipe makes a double batch. Before purchasing the gargantuan rolling pin, I always had to divide the dough after mixing it into 2 discs. The normal-size rolling pin was too small to handle the full double batch.
I decided to search online for a bigger pin. Results? No results, EXCEPT one.
The rolling pin:
Cost: $57.99 before shipping (at time of writing this)
Where? The Cookie Countess
Was it worth the money?
Every penny is worth it!
The all-wood rolling pin I purchased was for ¼” thick cookies. It’s a whopping 26“ long from end to end. It has saved me so much time and frustration. No more dividing the dough. I can roll it all at once!
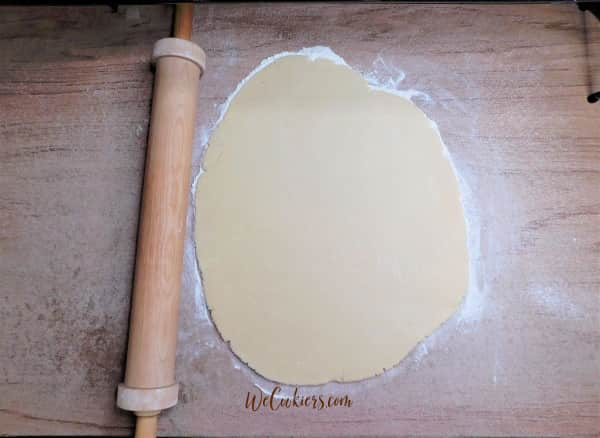 double batch of sugar cookie dough rolled at once
Next…(if you use flour. Some like rolling it out between parchment paper. How do they do that?! Mine always wrinkles and makes impressions in the dough. Oh well, I get along better this way)
1. Flour your work surface.
2. Place a dough disc that is firm, not soft, on the flour.
3. Lightly flour the disc and dust away the flour with a pastry brush.
4. Roll the dough out to the thickness you like.
5. Cut with the cookie cutters. Take a look at these (almost all original) cookie-cutter flips.
6. Place about 1”-2” apart. This recipe does not spread if you make sure to freeze them first, but you don’t want to crowd them.
7. If you have more than one sheet to fill, place the medicine cups in the corners, as shown in the image above, to stack them.
8. Freeze cookies to ever-so-slightly bendable to solid.
How to bake sugar cookies professionally
With this recipe, you freeze the cut-out cookies solid. This ensures they won’t spread. However, there have been many times they were semi-frozen (slightly bendable) and they still didn’t spread.
A lot of times I have had the cut-out cookies in the freezer on the pans with parchment up to 3 days before baking (yes uncovered). As long as you don’t have any odors in your freezer, and nothing is above them that could fall on them, they will be just fine. I have a freezer devoted to just cookies.
They do sell plastic lids for the 1/2 sheets. That is a great option. I've just been doing this so long that it's become second-hand to me. I don't see spending the money for myself. Ouch! They are expensive!
However, if you do want to place the cut-out cookies in the freezer for a few days, they would assure you of no freezer odors soaking in.
When they are frozen, heat the oven to 350 degrees.
Once frozen, take the pan and place it immediately into the heated oven.
For 3”-5” cookies, it should take 13 to 14 minutes. For 1”-2” cookies, give them about 10 minutes and check them. This will depend on your oven. If your oven has hot spots in it, you'll need to rotate the pan halfway through.
To get a soft cookie, under-bake them a little. They will be slightly glossy looking on top. Don’t worry, they will continue to bake with the heat in them when removed from the oven.
***Here are 5 tips on how to bake sugar cookies:
1. This recipe is meant to be soft and have no browning. However, if you like crunchy cookies, just leave them in the oven until slightly browned.
2. Does your oven bake uneven? Try turning the pan 1/2 way through baking.
3. Never crowd your cookies. Have at least 1” between the cookies. Crowding them can cause uneven baking.
4. Never place more than one pan in the oven. This can also cause uneven baking.
5. If you can fit 2 sheets side by side, make sure the pans do not touch each other or the sides of the oven. This is hard on the oven as well as causes uneven baking.
How to bake sugar cookies…removing cookies from the oven
Contrary to what you were taught, this recipe coupled
with the cookie sheets I use, you can save yourself some real time by NOT
placing them on cooling racks.
That’s right, NOT removing them. As long as they are slightly under-baked, I remove them from the oven after 13 minutes and take them straight to my baker's rack to cool on the baking sheets.
These cookies, done this way, will not turn brown on the
bottoms.
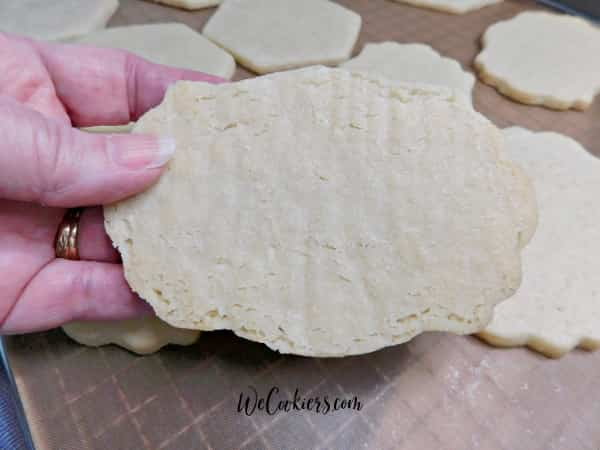
After the sugar cookies are baked and well-cooled, I then place them on a Teflon sheet on top of a food dehydrator rack to begin flooding them with royal icing. (Learn about the food dehydrator I use and why I Iove it on this page: Royal Icing Flooding.)
If you do not have a dehydrator, using the stacked baking sheets with medicine cups can help greatly with overnight drying to save space. Some sugar cookie decorating artists place a fan on them all night. Just don't get your fan too close or the royal icing could have a rippled look when dried.
You just baked yourself right into some delicious and mouth-watering sugar cookies! Go ahead and add this supreme royal icing that will melt in your mouth! Can't use royal icing for various reasons? Use this glaze recipe that is very close to royal icing!
Would you like to spice up your sugar cookies with different flavors? Here's a link I think you'll enjoy: Prepared Pantry
This page on How to Bake Sugar Cookies isn't the best way necessarily, but it makes it easy for me. I just hope it does for you.
Here is your link back to How to Make Professional Cookies.
Top of How to Bake Sugar Cookies


