- Home
- How to Make Pro Cookies
- Royal Icing Flooding
Royal Icing Flooding, Must-Know Tips
Royal icing flooding. Page highlights:
- Flooding problems with Q&A
- Supplies to start. Bonus: a brief talk about what to look for in food dehydrators for crusting royal icing.
- Royal icing tips and hacks
Royal icing flooding is the first stage when you begin decorating sugar cookies.
This stage, also called the base coat, is the most important. You need to get the sugar cookie icing as perfect as possible to ensure the decorating turns out beautifully!
Royal Icing Flooding problems with questions and answers
Let’s troubleshoot some common problems with royal icing flooding…
· Icing runs off the cookie
 Too runny icing for sugar cookies
Get my Superior Royal Icing, a.k.a. sugar cookie icing recipe or glaze (delicious recipe here). It should be a 12-15 second consistency.
12-second consistency means if you spoon up some icing and drop it back in, it takes 12 seconds for it to disappear. 15 seconds means the same, but it takes 15 seconds to disappear.
The ribbon method means pretty much the same thing.
12 or 15-second flooding. Which one?
This depends on whether you plan on using the same consistency to pipe the border and flood the cookie (grab the best sugar cookie recipe here).
Some decorators prefer using only one consistency to outline and fill. This saves work but gives less control of the icing. Use 12 seconds if you plan on using this technique.
If you want the feel of more control, use 2 piping bags, one with 12 seconds (outlining) and one with 15-second royal icing (flooding).
However, just starting, I recommend the 2-bag technique. It's easier.
If you are piping royal icing transfers onto a royal icing template sheet or transfer sheet, you'll want the sugar cookie icing to be as thick as possible and still be smooth (perhaps tickling it with the scribe to settle it). You can get unique transfer sheets in my shop here: Shop Gotta-havs
· Air bubbles in the icing
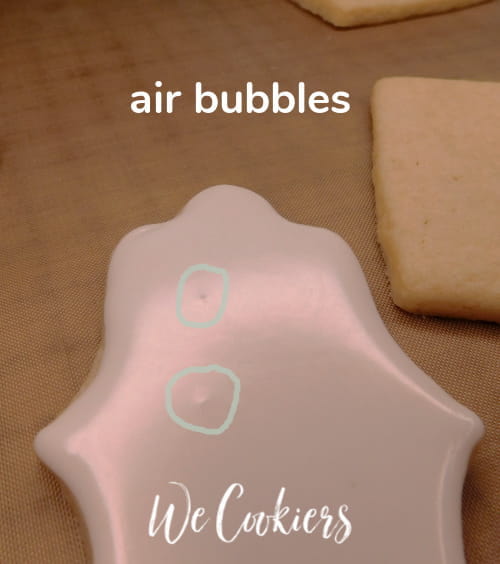 Air bubbles trapped in royal icing
Ugh, those dreaded air bubbles. Where do
they come from?
First, do not over-mix when making the sugar cookie icing. Mixing too long incorporates air into it and will compromise the puffiness when it's dried.
Make sure to use the whip attachment instead of the paddle. Always make sure it's on the lowest setting, too. Refer to the Sugar Cookie Icing page on how to make my Supreme royal icing or the glaze recipe.
Second, after mixing the colors, it should sit for a while, preferably overnight. This allows the air bubbles to rise to the top.
Third, adding too much liquid can contribute
to air bubbles, color bleeding, and extended drying time.
- Icing turns out flat on the cookie...
 Strive for puffy, not flat sugar cookie icing
Want puffy icing on cookies?
Try not to over-mix the icing. Also, adding too much liquid will make them flat.
Note: It's faster to have the royal icing flooding thinner, but this gives more bubbles, color bleed, and a flatter top.
· Cracks in the royal icing
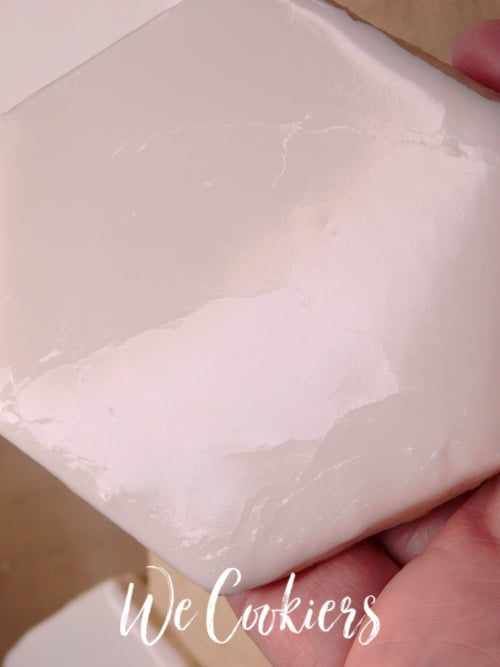 Cracks in icing
After flooding the sugar cookies, leave them to sit untouched overnight if possible.
Though they may look set up, only the tops are crusted. Underneath is still wet.
Side note…a common myth is to place them in a dehydrator and they will dry. Dehydrators are wonderful for sugar cookies. I wouldn’t want to live without mine as a sugar cookie artist.
However, dehydrators only help the icing to dry on top. This enables the decorator to pop them in to add another color or layer faster.
This is the commercial food dehydrator I ended up with. It holds 10 racks. Each rack holds about 15 sugar cookies, about 3" in size. The cookies below are 4".
What are the biggest benefits of using a dehydrator for crusting the royal icing flooding?
-getting a beautiful shine
-crusting the icing to add a different layer and/or color fast
-assures you of no color bleed (if you use my icing and cookie recipe)
Well over 20,000 downloads on my Superior RI and still counting!
|
|
|
 |
"A food dehydrator is a must if you are serious about becoming a professional cookier. "What do you need to look for before buying a dehydrator? "Follow my own 'Rule of 5'." |
Rule of 5
1. First and foremost, it needs to have a fan placed in the back to blow across all of the shelves at once.
2. A door that swings in the front.
3. Stainless steel shelving. Plastic breaks easily.
4. A dehydrator with a temperature that goes down to 95 degrees, which is the ideal temperature to crust royal icing.
5. A rectangle/square dehydrator instead of a round one. Round ones require you to keep rotating them. That is detrimental to icing, as it will cause cracks and wavy tops.
My mother purchased the smaller Cosori dehydrator and loves it too.
If you want to ease into a purchase with the smaller model, it will certainly do the trick for you. It will hold roughly 9 to 10, 3" cookies per tray (roughly 4 dozen 3" sugar cookies). This is the 5-tray model:
- 𝟭𝟳𝟲 °𝗙 𝗠𝗔𝗫 𝗧𝗘𝗠𝗣𝗘𝗥𝗔𝗧𝗨𝗥𝗘: Adjust the dehydrator between 95-176°F
- Includes 5 trays, a recipe cookbook, a mesh screen, and a fruit roll sheet.
- Dimensions of 13.9 " x 11.3 " x 8.9 "
- Read more...
If you are going straight into a growing cookie business, you probably want to opt for the 10-shelf model that I did. It holds 15, 3" cookies on each shelf. Therefore, approximately 150 (or 15 dozen) cookies:
- Large capacity and stainless steel: 10 stainless steel trays (15.55" x 14.96")
- The glass door lets you monitor food without letting the heat out
- Read more...
· Color bleed
 Poor little sloth!
Many reasons cause color bleed. For efficiency, fighting color bleed, and time-savers, get this 3+ page valuable instant download Royal Icing Tips and Hacks list to save your business!
This is my partial list of the full download:
- Use quality food gel--The only food gel I will use is Americolor. I've tried others, but these are high-quality and oh-so vibrant. I very much appreciate them.
- Add white food coloring when making icing. AmeriColor gels are my go-to, as noted above.
- Do not cover cookies until completely dry
- Never refrigerate iced cookies (humidity in the fridge)
- If you are using food color markers and you notice color bleed, certain markers aid in this.
Go here to see a comparison I did of 7 different brands of food markers.
Before you start with icing, make sure you have the perfect cookie recipe, and make sure to click on How to Bake Sugar Cookies to make your life easier with my time-saving hacks.
What are my favorite baking sheets? You might be surprised. Best Baking Sheets.
Here is also a link for a sugar cookie glaze recipe that's really nice!
Supplies you will need for royal icing flooding
1. blank cookies
2. Royal icing outline consistency in piping bag, #3 icing tip. See the 7 icing tips to start a cookie business here: Royal Icing Tips
3. Royal icing flood consistency in piping bag, I like to use a #5 icing tip
4. scribe or toothpick
5. paper towel or cookie turntable
6. wet paper towel or cloth
7. favorite music

Focus on the work at hand. Be detail-oriented. It's when you pay attention to the fine details that it catapults you into a pro-level decorator. I can't say it enough:
Detail. Detail. Detail. That's how to make professional cookies!
Royal Icing Flooding with tips/hacks
Keep in mind that this is an A-Z sugar cookie site. Thus, we
are starting at the very beginning. You can click ahead to Cookie Decorating Techniques, if you like.
Also, just because this is the way I decorate does not mean it’s the best or only way. Don’t be afraid to think outside the box.
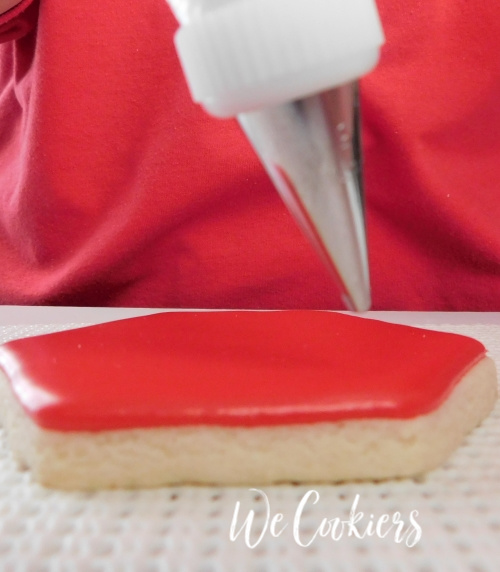 Flood coated sugar cookie
With a piping bag in hand, take the thicker outline icing
and draw a line around the shape of the cookie. This is called the dam or border.
Lightly touch the tip down on the cookie to start, and raise the tip about ½” to 1" away from the surface. Whatever you are comfortable with.
Do not pull the icing; just let it fall in a straight line, letting gravity have its way.
You need to be aware of the steady squeeze of the bag as you move it along. Nice steady pressure.
As you come back to the starting point, begin releasing the squeeze so there isn’t a glob when you meet it. This is where your scribe will come in handy.
The royal icing may need to be smoothed out a little when the two ends meet.
If you like a borderline showing, set it aside and pipe the borders on the rest of the cookies.
If you prefer to go borderline-free, you can go ahead and start flooding carefully, as not to let the icing go over your line.
Done?
Take the first cookie you piped. With the other icing bag, flood the sugar cookie.
Keep going until you have finished royal icing flooding all the cookies. Preferably a dozen. This will give you lots of practice.
If you see bubbles rising to the top, just take your ‘bubble popper’ (scribe) and pop them. There will be others that will pop on their own, so don’t worry too much.
Great job!
Don't fret if yours don't turn out perfect. Royal icing flooding is like anything else...practice makes perfect.
You've now finished royal icing flooding.
Here is a link back to How to Make Professional Cookies.
Top of Royal Icing Flooding

